UPDATE: Alphatheta has suspended distribution of CDJ-3000 firmware v3.30 and
issued a
press release
recommending users to downgrade.
Just in time for Halloween weekend,
stories have started
circulating on social media about my biggest nightmare as a DJ. You show up to a
gig with a neatly organized USB. You plug it into the CDJ-3000, and none of your
playlists are there. You always carry a backup, so you plug that one in. No
playlists to be found there either. In a ghostly disappearing act, all your
playlists have vanished. Your heart races as you wonder what you'll do with this
mess of disorganized music on your stick. What supernatural phenomenon caused
this?
Well, it turns out it's just an update from Pioneer DJ / AlphaTheta. On October
21, 2025, Pioneer released CDJ-3000 Firmware Version 3.30 to add support for
OneLibrary, a new collaboration with
Algoriddim and Native Instruments based on Rekordbox's Device Library Plus.
The release notes
mention that "If Device Library and OneLibrary are both present on a USB storage
device, OneLibrary will load by default." They don't mention any deprecation of
Device Library, and in fact still list Device Library as compatible in a
support page.
It's unclear whether the behavior people are seeing is a bug or a full
deprecation of Device Library.
Without a CDJ-3000 to test this on, I can only go by what I'm seeing online, but
from what I understand, there are two ways to get yourself out of this DJ
nightmare if it happens to you:
Be prepared with Device Library Plus on your USB (or ask to borrow someone's
laptop)
Carry around a copy of the CDJ-3000 v3.20 firmware (the last compatible
version) so you can downgrade club equipment
I'm going to show you how to do both of these.
Be prepared with a Device Library Plus version of your USB
Starting with Rekordbox 6.8.2, Rekordbox started exporting
Device Library Plus,
a new format required for AlphaTheta's new "Opus" hardware. So far, it hasn't
been required unless you're using those devices. Many DJs (including me) have
held off on upgrading Rekordbox as AlphaTheta enshittifies it with
subscription-supported junk, but at least there's a version of Rekordbox 6 that
supports Device Library Plus.
Device Library Plus does not duplicate the files on your USB, it just
creates a new library file that links to your files on your USB. Both Device
Library and Device Library Plus can coexist on the same USB. With AlphaTheta's
transition to OneLibrary, it looks like Device Library Plus is now becoming the
default on new Pioneer CDJ devices, including the CDJ-3000 and CDJ-3000X.
All you need to do to use Device Library Plus is export from version 6.8.2 or
later of Rekordbox. Also note that you can actually run multiple versions of
Rekordbox side by side on your computer, so you can use Rekordbox 5 or 6 to
manage your library but then just do USB exports on a later version of
Rekordbox.
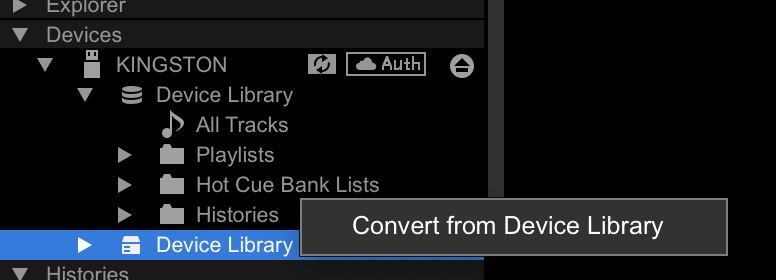
You can set up your existing USB with Device Library by plugging it into any
laptop with Rekordbox 6.8.2 or greater. Rekordbox will prompt you if you want to
upgrade to Device Library Plus, or alternatively you can go to the Devices
section of Rekordbox, expand your USB, and click on "Convert From Device
Library". Conversion should take less than a minute and will keep your existing
Device Library around. This can be great in a pinch because you can just ask a
friend or the someone at the venue if they have a laptop, quickly install
Rekordbox, and be ready to go in just a few minutes.
Personally, I think being prepared with Device Library Plus is a better solution
than downgrading the CDJ firmware, as it will guarantee your USB works on
Pioneer's new CDJ-3000X, which ONLY supports OneLibrary / Device Library Plus.
You may start seeing more of these in clubs.
Carry around a downgrade on your USB
CAUTION: Be careful when doing this on club hardware you don't
own! Following these instructions incorrectly could cause you to brick a club's
equipment right before you're supposed to play. I would recommend just using Device
Library Plus.
The last known "good" version of CDJ-3000 firmware was v3.20. Pioneer has made
this kind of hard to find, but thanks to Seattle DJ
Bimbo Hypnosis's sleuthing, we have a
downgrade file. I've uploaded it to
Archive.org.
Extract the zip file to the root directory of your USB. It should be a file
named CDJ3Kv320.UPD. Keep this file on your USB should you need to downgrade a
CDJ-3000 in an emergency. This can even be on the same USB that contains your
music! However, your USB must be formatted with FAT or FAT32 for the
downgrade to work.
Power off the CDJ and remove USB drive, SD card, Link cable, and computer
cable.
Turn on the CDJ while pressing both "IN/CUE" and "RELOOP/EXIT" buttons.
Insert your USB with the update file into the USB port.
Update process will begin and a progress bar will be displayed on the
screen.
Do not turn the power off during the update.
The update will be completed in about 1 minute.
When it's done, the following message will appear:
[Firmware update is completed. Turn the power off before using.]
Power off the CDJ.
Stuff can go wrong if you do this. AlphaTheta notes:
If the progress indicator does not progress during updating and update
completed message does not appear after 10 minutes, or if the message [MAIN
> firmware update failed] or [PANEL firmware update failed] appears, contact
our customer support center.
A note to clubs and promoters
Hold off on upgrading the firmware of your CDJ-3000s for now! You don't want
your talent to be caught off guard by this. Hopefully AlphaTheta will put out an
update that handles this better, or at least people will slowly become aware of
these compatibility issues and upgrade to Device Library Plus.
Stay Prepared
The CDJ-3000 firmware situation is a reminder that even routine updates can
create unexpected problems when you're gigging. Whether AlphaTheta intended to
deprecate Device Library or this is just a bug that will be fixed, the lesson is
clear: always have a backup plan. My recommendation is to update your workflow
to export Device Library Plus versions of your USBs. It's the forward-compatible
solution that will work on both current and future hardware. But if you prefer
to stay on older Rekordbox versions or want an emergency escape hatch, keeping
the v3.20 firmware file on your stick gives you options. Either way, don't let a
firmware update be the thing that derails your set. Test your setup before the
gig, carry redundant USBs, and know your options if things go sideways.
Best of luck at your next gig, and may your playlists always load on the first
try.
Email me if you have any corrections or new
discoveries, and buy me a coffee if
this helped you.
Thanks to Succubass for bringing this all to
my attention on Instagram, and
Bimbo Hypnosis for sharing the v3.20
firmware.
"How did you do that?" A friend of mine asked a few weeks ago when he saw me
right-click a file, click "Get Spectrogram" and watch an image like the one
above appear on my screen. I had just downloaded a file from Soulseek[1] and
wanted to verify whether the purported AIFF file was actually legitimate or a
bad transcode. Once I confirmed it was genuine, I right-clicked again and
converted it to 320kbps MP3—all without leaving Finder.
I had achieved this by using a feature of macOS called "Quick Actions".
Quick Actions,
introduced in macOS High Sierra, allow you to build your own plug-ins that can
be applied in other apps. They can be used by right-clicking files, folders, or
text, and can even have keyboard shortcuts assigned to them. They're extremely
powerful tools that allow me to do all kinds of tasks on my computer. As a DJ
and music collector, I use Quick Actions to help me convert files and verify if
the files I have are what they claim to be.
If you already know what transcodes are and how you can detect them, skip ahead
to the installation guide.
Why audio quality matters for DJs
If you've ever heard a song sound great on your laptop speakers but terrible
when a DJ plays it out, you've probably experienced the difference audio quality
makes. Club sound systems are unforgiving. They'll expose every loss of fidelity
in a low-quality file.
MP3 is a "lossy" compression format, meaning the compression algorithm causes
actual loss of audio data. The lower the bitrate (represented in kbps) of an
MP3, the more audio data loss and the lower the sound quality. The general rule
of thumb is that music you plan to play as a DJ should at the very least be
320kbps MP3. Some DJs only play lossless music (WAV, AIFF, or FLAC), but this
does take up more storage space.
Most of the music in my Rekordbox library is 320kbps MP3. For some important
tracks, I prefer to have it in lossless AIFF. I don't put FLAC files into
Rekordbox because some older CDJ models do not support FLAC. As a result, I
often find myself converting file types, and I wanted a quick way to do so
directly from Finder.
The problem with bad transcodes
Some files you may find on the internet may be "bad transcodes" (or just
"transcodes" for short). These are files that claim to be lossless or a certain
bitrate MP3, but are in fact not.
The first time a file is converted to a lossy format, audio information is
permanently lost and can never be recovered through further conversion. Bad
transcodes can be created by converting a lossy format more than once (for
example converting a 128kbps file to 320kbps, or vice versa), or by converting a
lossy format file back to a lossless format.
In general, if I'm buying music from an online marketplace like Bandcamp or
Beatport, I can trust that a WAV or AIFF is actually lossless and a 320kbps MP3
is actually a 320kbps MP3. However, I never trust the quality of a file I
download from Soulseek. You would be surprised how many times I find that a
supposedly lossless or 320kbps file from Soulseek is actually an upconverted
128kbps YouTube rip.
What does a bad transcode look like?
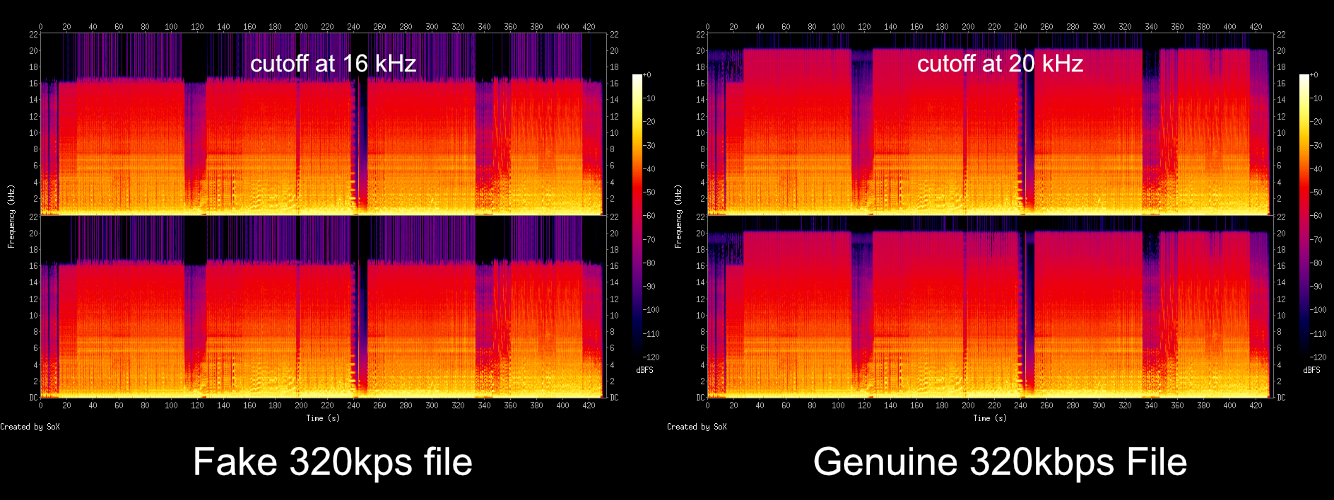
Audio files can be represented visually through a graph called a spectrogram. A
spectrogram shows which frequencies are represented in an audio signal over
time. Since lossy formats generally remove audio information at higher
frequencies, we can often see the difference between a transcode and a valid
file in the spectrogram.
The image below shows two versions of the same song that both claim to be
"320kbps". One is a genuine 320kbps MP3, and the other is a bad transcode (a
128kbps file that was converted up to 320kbps):
Notice how the genuine 320kbps file has frequencies extending all the way up to
20kHz, while the bad transcode has a sharp cutoff around 16kHz. This cutoff is a
dead giveaway that the file was originally encoded at a lower bitrate.
If you want more information on spectrograms, check out
Redacted Interview Prep
for a good guide.
My workflow
My general workflow when I download a file is to first analyze the spectrogram
to verify the file is not a bad transcode. If the file I downloaded is truly a
lossless AIFF or FLAC, I then convert it to the desired format. To speed up this
workflow, I have created 3 Quick Actions:
Get Spectrogram - generates and shows a spectrogram image for the
selected file
Convert to MP3 (320) - converts audio files to 320kbps MP3
Convert to AIFF - converts audio files to lossless AIFF
Installation guide
This installation guide will walk you through how to install
sox and ffmpeg.
If you already have these installed or have a preferred way to install command
line tools, you can skip ahead to
Install The Quick Actions.
Caveats:
Setting up these Quick Actions will require you to use the Terminal to install
some programs. It's pretty easy, and I will walk you through it.
Quick Actions are a Mac-only feature, but maybe Windows and Linux distros have
similar concepts. The scripts that these Quick Actions use could still be
useful to you regardless of what platform you're on.
Opening up Terminal
You can find the Terminal on the Mac by opening the Applications folder, then
going to the Utilities folder, and finally double-clicking on Terminal.
Installing Homebrew
Homebrew is a command-line package manager macOS. It allows
you to install the programs you will need to run these Quick Actions in the
Terminal.
To install Homebrew, run this command in your Terminal:
Once you've unzipped automator-actions-for-djs.zip, you should see a folder
with 3 files, one for each Quick Action. To install, double click each of them
and click "Install" on the dialog that shows up.
🎉 Hooray! The Quick Actions should now be available to use. Right-click any
audio file in Finder to use them.
What's next?
With these three Quick Actions installed, you'll be able to quickly verify and
convert audio files right from Finder. No more guessing whether that "lossless"
file is actually what it claims to be, and no more opening separate apps just to
convert between formats.
Quick Actions can be a powerful tool for all kinds of problems, so I encourage
you to try and find your own ways to save time by experimenting with them!
Questions or issues? Feel free to
email me if you run into any problems
setting these up. I'll try my best to keep this article updated with any
problems people bring up.
Found this helpful? Consider
buying me a coffee to support more
DJ tools and tutorials!
I make my best effort to purchase as much new music as I can, but for very
old vinyl-only tracks, often the easiest way to get them is from Soulseek. ↩︎
Naturally, when I received the invitation to play, my first reaction was to
start bawling.
I'm already so anxious to share music with friends new and old at this
experimental, intentional rave. Be sure to check out the site and read more
about the idea.
As people talk about moving away from social media and look towards other paths
to community on the web, I have been thinking about how many people and
businesses have forgotten about the importance of making their own websites.
I know plenty of people who promote themselves online but don't have any web
presence beyond social media. For a couple of years, even I let my website fall
into neglect.
Like most other musicians, DJs, and business owners, I've felt like leaving
social media is nearly impossible. It's where I announce shows, promote my
projects, connect with like-minded people, and have fun. The idea of moving away
from it is terrifying... what if all those connections disappear?
But the connections we build through Instagram, Tiktok, and Twitter are not
entirely our own. They filter through obfuscated algorithms that dictate what
people see. We worry about getting "shadowbanned" or wonder why our event flyer
isn't getting as much engagement. We re-structure our speech and our content to
try and satisfy the algorithm. Meanwhile, we're fed addictive content, often at
the cost of our well-being. If we step out of line, we risk our content being
removed or fading into digital obscurity.
I always have gone to the web for connection and for fun. But this? This isn't
cool or fun at all.
The solution isn't just hopping over to a new platform. Substack is not just a
way to send newsletters, it's another social media platform that
does not ban Nazis.
Medium is a terrible platform to read on. And even though I use Bluesky, it's
just
Twitter methadone. We
can't trust platforms to stay good.
We can only make the web better by doing it ourselves.
Make a website. Make a blog with an RSS feed. Start an e-mail list. Visit your
friends' websites.